Monday, March 12, 2012

Tagliatelle with Chicken from the Venetian Ghetto

I've had a Nigella Lawson cookbook for some years now. Ever since I first saw her cooking show back when it was on the Style network, I fell in "foodie" love.
Not only is she just gorgeous to watch, but she talks about food with such beauty, eloquence and passion. Her descriptions of food are so vivid and flowery, but without being over the top. She really has a gift for making great food and being able to talk about it in gorgeous descriptions. I just love her recipes!!
Photobucket
This one such recipe caught my eye after seeing her make it on the show years ago. It just looked and sounded so flavorful and tasty. So after I made a dinner of Grand Marnier Roasted Chicken , I planned ahead. I saved all the pan juices and used the leftover roasted chicken to make this pasta dish. It was so good.
Photobucket
The sauce is silky and rich with great meaty flavor. The rosemary, raisins and pine nuts give it a woodsy, hearty feel - perfect for a fall dinner or cold winter evening. It's true comfort food. And pretty simple to put together as well - especially if you've already done half the work the night before. So from one roasted chicken I got two fabulous meals. It was a good week. Enjoy!!


Tagliatelle with Chicken from the Venetian Ghetto
Nigella Lawson How to Eat: The Pleasures and Principles of Good Food
Photobucket
1 3-1/2 lb chicken
2 tablespoons extra-virgin olive oil
salt and freshly ground pepper
leaves from 3 rosemary sprigs, minced
1/3 cup sultanas, soaked in warm water for 30 minutes
1/2 cup pine nuts, lightly toasted
1 pound tagliatelle
2-3 tablespoons chopped parsley

Preheat the oven to 350.
Rub the chicken with the oil and sprinkle with salt and pepper then place it breast down in a roasting pan and roast for about 1 1/2 hours or until well browned, turning it over toward the end to brown the breast. It's done when the juices run clear, not pink, when you cut into the thigh. When the chicken's nearly ready, put abundant water on for the pasta, salting it while it boils.
Take the chicken out of the oven and take the meat off the bone, leaving all the skin on, and cut it into small pieces. For the sauce, pour all the juices from the roasting pan into a saucepan. Add the rosemary, the drained sultanas and the pine nuts. Begin to simmer the sauce when you are ready to cook the pasta. Cook and drain the pasta and toss it with the sauce, chicken pieces and parsley in a large bowl. Serve with grated romano cheese if desired.

Wednesday, February 29, 2012

Grand Marnier Roasted Chicken

I've been eyeing this recipe in my Nordstrom Friends and Family Cookbook for a while now. The name alone is what drew me in. It just sounds so elegant and flavorful. Just imagining the sweet and savory combination of orange and rosemary on tender roast chicken makes my mouth water. It's what I would call, succulent, even though I kind of have a problem with that word. I think it's the way it sounds coming out. There is something slightly off-putting about it. It just seems like an almost obscene way to describe a food. I feel like I've said a dirty word - say it slow and maybe you'll see what I mean. Suuuuuccculeeennntt. Hmmmm.
Anyway, I reserve it for things that are truly opulent. And I think a fall-off-the-bone roast chicken glazed in an expensive orange liquer fits that bill. Anyway, enough of me and my problems with "succulent". I'm just a food adjective prude I guess.
Photobucket
I have had a frozen 4-lb bird in my freezer for, well, too long to mention without being a bit embarrassed. I think it's been 2 months?? So I thawed it out and started to plan several dinners around it. The first being this roast chicken. The best part about this recipe, hands down, is the Grand Marnier glaze. If I was you, I would glaze your chicken as the recipe says, but definitely reserve a good bit of this glaze for dipping your moist chicken into while eating it. It should not be missed!!
Photobucket
And don't throw away your chicken carcass. I threw mine in the fridge and plan on making some homemade chicken stock with it later in the week. In addition, I saved the pan drippings that the recipe has you pour off to make Nigella Lawson's Tagliatelle with Roasted Chicken from the Venetian Ghetto. It uses the pan juices to create a deliciously light sauce for pasta. It also incorporates the leftover roast chicken. I'll be blogging this shortly!
Meanwhile, start with this roast chicken. And don't be afraid to coo to your cooked bird and tell it in a sultry voice how succulent and saucy it looks. I'm sure your chicken will appreciate you whispering sweet nothings to it before you eat. Enjoy!!

Grand Marnier Roasted Chicken
Nordstrom Friends and Family Cookbook
Photobucket
1 chicken (about 4 lbs)
1 orange, quartered and seeds removed
3 large fresh rosemary sprigs
5 fresh thyme sprigs (this was my addition)
1 small onion, quartered
kosher salt
fresh ground pepper
1/2 cup water
3 tb unsalted butter
3 tb whole-grain mustard
3 tb apricot preserves
3 tb honey
3 tb Grand Marnier

Preheat the oven to 400 degrees. Place the chicken, breast side up, on a rack in a small roasting pan and squeeze the juice from the orange quarters over the chicken. Place the orange quarters inside the cavity along with the rosemary, thyme and onion. Season the outside of the chicken generously with salt and pepper and if you have extra fresh herbs throw those on as well. Pour the water into the bottom of the pan.
Roast the chicken for 30 minutes. Rotate the pan 180 degrees and reduce the heat to 375. Continue to cook for 25 minutes longer.
While the chicken is roasting, melt the butter in a small saucepan over medium heat and then stir in the mustard, preserves and honey. Cook stirring constantly until well blended, about 2-3 minutes, and then add the Grand Marnier. Stir to combine and remove from the heat.
Remove the chicken from the oven, pour off the juices from the pan (and reserve this for future use in another dish - simply bottle and refrigerate) and brush the chicken with the Grand Marnier glaze. Continue roasting the chicken, basting frequently with the glaze until the juices run clear when the thigh meat is pierced with a knife and the drumstick moves easily, about 15 minutes longer. If the chicken is browning too quickly, tent it with aluminium foil.
Remove the chicken from the oven and let rest for 10 minutes before carving and serving.

Sunday, February 26, 2012

Honey Apricot Pork Cutlets

In honor of our little porkchop, who arrived a week early on Feb. 18, I made this quick and simple, yet flavorful, pork dish. Our second daughter made her debut a little over a week ago, much to our surprise. I never thought I'd be lucky enough to deliver a baby early. I didn't miss that last week of pregnancy, that's for sure!! She is totally perfect and looks so much like our first daughter that it's uncanny.
Photobucket
So with two little ones around, I'm on the market for easy, quick dinners but at the same time I don't want to fall into a rut - which is so easy to do when you have no time. I will admit, we indulged in a lot of carry-out this past week. It's so much easier to leave the cooking to someone else when you're functioning on 4 hours or less of sleep. The greasy, heavy, mediocre quality of the food however, gets old REALLY fast. So I'm going to try to put some homemade meals on the table as much as possible, but not beat myself up if we need to phone a carry-out friend to get us out of the weeds.
Photobucket
Stay tuned for a decadent roast chicken later in the week that turns into some awesomely comforting homemade chicken stock for a hearty ribollita soup. And along the way, I plan on using the leftover roast chicken in a savory Nigella Lawson pasta dish. I can't wait to tackle those meals!
Meanwhile, I present this Rachael Ray recipe. A tasty twist on traditional pork cutlets. I served it with a nice fresh salad and steamed green beans. I changed the title that is given on the Food Network website, as I didn't think "Honey Mustard Cutlets" really described what the dish consisted of. Call it creative liberties. Enjoy!!!
(Oh and please excuse the crudity of these photos. We didn't eat until 8:30 p.m. that night, after our toddler was tucked into bed, so I snapped a few quick pics with my point and shoot because it was handy. I'm not proud of them, but I always think when it comes to a food blog some picture is better than no picture.)

Honey Apricot Pork Cutlets
courtesy of Rachael Ray, www.foodnetwork.com
Photobucket

4 thin-cut boneless pork loin chops
Salt and freshly ground black pepper
1/4 cup grainy Dijon mustard
1/4 cup honey
2 tablespoons cider or wine vinegar
1 cup bread crumbs
2 tablespoons freshly chopped thyme leaves
1 lemon, zested (I omitted this)
2 tablespoons extra-virgin olive oil
2 tablespoons butter
2 tablespoons all-purpose flour
2 tablespoons orange marmalade or apricot preserves
1 cup chicken stock
2 teaspoons Worcestershire sauce
Directions
Line a baking sheet with a wire rack.

Heat the oven to 275 degrees F.

Trim the fat from the chops and sandwich each chop between 2 pieces of waxed paper or plastic. Pound the chops to 1/8-inch thickness and season with salt and pepper, to taste.

In a shallow dish combine the mustard, honey and vinegar. Add the chops and turn to coat in sticky sauce. On a plate combine the bread crumbs with the thyme and zest of the lemon. Press chops in the crumbs to coat evenly. Heat the extra-virgin olive oil, a couple turns of the pan, in large skillet over medium heat. Cook the cutlets until crisp, 3 to 4 minutes on each side. Arrange the chops on the baking sheet with the rack and put in the oven to keep them crisp. To the skillet, over low heat, add the butter and melt. Whisk in the flour and cook for 1 minute. Stir in the preserves, then whisk in the stock. Cook for a couple of minutes to thicken and season with salt and pepper, to taste. Transfer the chops from the oven to a serving platter and douse with sweet-savory gravy before serving.

Tuesday, February 14, 2012

Happy Valentine's Day: Strawberry Pina Colada Shortcake

Why do I do this to myself? Why do I make an entire decadent cake when the only people around to eat it are myself and my husband? My thighs and hind quarters were pleading with me throughout the whole baking process and the subsequent multiple tastings of the pineapple cream cheese frosting....WHY????????
Well I'll tell you why. Because when you are 9-months pregnant you shove aside the nagging guilt and give yourself a break. I was craving strawberry shortcake and Valentine's Day was conveniently around the corner. So I surfed the interwebs and found these two delicious recipes, Strawberry Shortcake Cake from The Pioneer Woman's blog, and Pina Colada Cake from Annie's Eats blog. I combined elements from both to satisfy my sweet tooth.
Photobucket
I used Pioneer Woman's cake recipe, which includes macerated fresh strawberries, and added coconut extract and shredded coconut from Annie's Pina Colada Cake . I topped it with the sinfully delicious Pineapple Cream Cheese frosting from Annie's cake recipe. That stuff is a dessert within itself. It would be wonderful as a dip for fresh fruit. I seriously had to stop myself from eating spoonfuls of it while I iced the cake. My gluttony at 10 a.m. was utterly disgusting. I am pretty sure I had a cream cheese frosting mustache from trying to lick the bottom of the bowl when I was done. Shameful indeed.
Photobucket
On top of the cake, my sweet sweet husband came home yesterday with a half-dozen chocolate covered strawberries from Godiva. Lord help my cellulite! At least the flowers he had sent were calorie-free and almost as enjoyable as the chocolate and this cake. Happy Valentine's Day!! Enjoy it, without feeling any guilt. Pregnant or not!

Strawberry Pina Colada Shortcake
adapted from Pioneer Woman and Annie's Eats
Photobucket

For the cake:
1-1/2 cup Flour
3 Tablespoons Cornstarch
1/2 teaspoon Salt
1 teaspoon Baking Soda
2/3 cup shredded sweetened coconut
9 Tablespoons Unsalted Butter, Softened
1-1/2 cup Sugar
3 whole Large Eggs
1/2 cup Sour Cream, Room Temperature
1 teaspoon Vanilla
1/2 teaspoon coconut extract

For the strawberry filling:
1 pound strawberries, hulled
2 tablespoons sugar

For the frosting:
3/4 cup crushed pineapple, drained
12 oz. cream cheese, at room temperature
18 tbsp. unsalted butter, at room temperature
2 2/3 cups confectioners’ sugar, sifted

Shredded sweetened coconut for decorating
More strawberries for decorating

IMPORTANT: Be sure to use a cake pan that’s at least 2 inches deep! Before baking, the batter should not fill the pan more than halfway.
Sift together flour, salt, baking soda, and corn starch.
Cream 9 tablespoons butter with the sugar until light and fluffy. Add eggs one at a time, mixing well each time. Add sour cream and vanilla and mix until combined. Add sifted dry ingredients and mix on low speed until just barely combined.
Pour into greased and floured 8-inch cake pan. Bake at 350 degrees for 35-40 minutes, or until set. Remove from cake pan as soon as you pull it out of the oven, and place on a cooling rack and allow it to cool completely.
Slice your strawberries and place into a bowl and sprinkle with 2 tablespoons sugar. Mash with a fork or muddler and set aside for 30 minutes while cake cools.
To make the frosting, puree pineapple in the food processor until smooth. In the bowl of an electric mixer, beat the cream cheese and butter on high speed until smooth and fluffy, about 4 to 5 minutes. Add powdered sugar and mix until smooth. Add pureed pineapple. If frosting is too liquid, allow to chill in the refrigerator 30 minutes before using to set up.
Now it's time to assemble your cake. Cut your cooled cake in half lengthwise with a serrated knife. Divide your strawberries in half and then top each cut side of your cake with one half of the strawberry mixture. Next frost the top of one of your halves until the strawberries are covered. Once complete, top with your other cake half and now you can begin to frost the entire cake. Once frosted generously, you can pat on your shredded coconut.
Refrigerate your cake to set the icing. Slice and serve.

Saturday, February 11, 2012

Mushroom Pesto Pizza

Ever since I was a little girl, Friday night has been pizza night. My mom used to make batches of homemade pizza dough, freeze them and have enough for a month's worth of "pizza Fridays". When I was younger, the pizzas were pretty traditional. Cheese, pepperoni or simple veggies with tomato sauce. Nowadays though, I like to shake it up. I've made countless different varieties of pizza. Sometimes I really think I should open a gourmet pizzeria. One day perhaps....
Anyway, I digress. Before I open up that pizzeria I would probably need to perfect a pizza dough recipe. Details!!
Currently, I buy the balls of pizza dough available in my local grocery store. All I have to do is let them rise for a few hours before baking so it makes the process of homemade pizza that much faster and easier. On top of that, the store-made dough makes a very good, crunchy tasty crust.
Photobucket
I always use the same technique for my pizzas. I grill the pizza dough over the grill. I start it out on a well-oiled jelly roll pan and then once it has been stretched thin and its shape has set I transfer it directly onto the grill grates. Once my dough has baked up to a nice, golden brown with beautiful grill marks, I remove it and place all my prepared toppings on. Then I put it under the broiler to melt the cheese and bring everything to an ooey gooey finish. I find this method ensures that I'll get a crunchy, crispy crust. I hate soggy or limp pizza crust so I crisp it up first and then place my toppings on. Works every time!
Photobucket
This past Friday I took my inspiration from a recent post on 
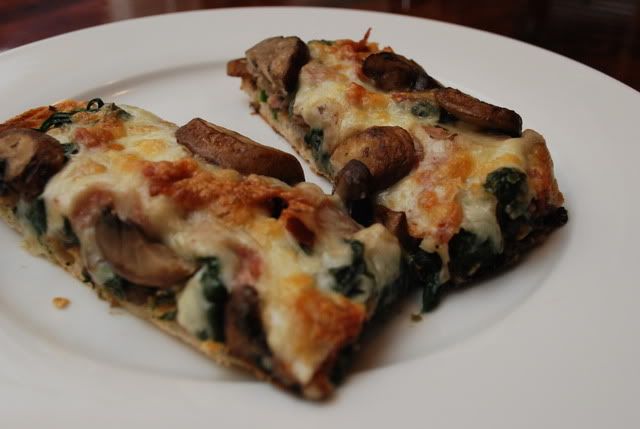
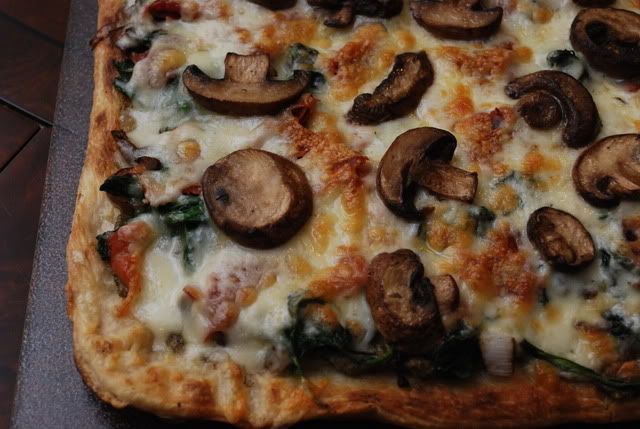
Annie's Eats for a Fontina Mushroom Pizza. A mushroom pesto is used as a base and topped with fontina, Parmesan and sliced mushrooms. I added a few twists for our pizza and it turned out delicious. The mushroom pesto really makes this pizza combo unique. The result is a hearty and savory pie. Here is my version. Enjoy!!

Mushroom Pesto Pizza
Adapted from Annie's Eats
Photobucket

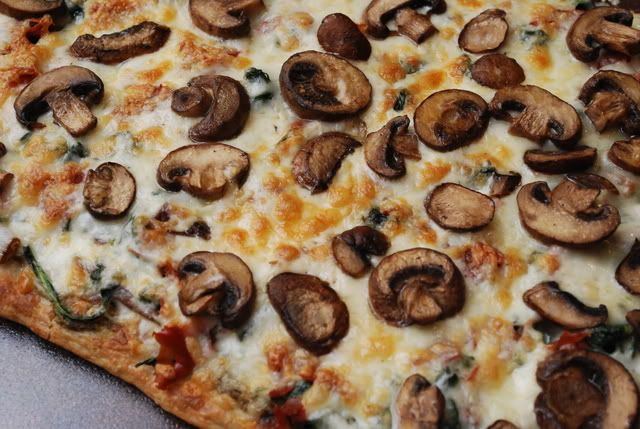
1 recipe for pizza dough, or 1 ball of pizza dough

Bake or grill your dough in a well-oiled pan or hot oven. Once baked, set aside until your toppings are ready.

For the Pesto:
I package of baby bella mushrooms, sliced and sauteed till tender
1/3 cup dried porcini mushrooms, reconstituted in warm water
1-2 tb fresh thyme
2 tb fresh chopped Italian parsley
1/2 cup toasted pine nuts
3 cloves garlic, minced
3 tb grated pecorino romano
1/2 cup olive oil

Place all the ingredients, except for the olive oil, into the bowl of your food processor. Pulse to chop. Once slightly combined, stream in your olive oil to create a thick pate-like mixture. Once fully combined, remove the mixture to a bowl and set aside.

Pizza Toppings:
1 sweet onion, sliced thin
3 tb olive oil
1 tb balsamic vinegar
1 package of baby bella mushrooms, sliced
1 bag of fresh baby spinach
2 cups fontina cheese, grated
6 thin slices of prosciutto

Preheat oven to 350. Arrange your thinly sliced prosciutto on a baking sheet in a single layer. Place in your hot oven and cook until crispy, about 15 minutes. Remove from the oven, and when it is cool, crumble your prosciutto and set aside.
Over a medium flame, add your thinly sliced onion to a pan with 2 tb of your olive oil. Saute until the onions are caramelized, about 20 minutes. Once softened, add in your balsamic vinegar and cook another 3-5 minutes until the vinegar has thickened and coated the onions. Remove from the heat and set aside. Wipe our your pan, and you can add your sliced mushrooms and the rest of your olive oil. Saute until tender and remove from the pan. Be sure to drain any excess liquid that may result from sauteing the mushrooms. You don't want to add that to your pizza because it will make it soggy.
Finally, steam your spinach until wilted slightly. Once cooked, squeeze out the excess water over a colander and set aside. Now you are ready to top your prepared pizza crust.
Preheat your broiler.
Lay your crust on the original pan you used to cook it in (I use a jelly roll pan so my pizzas always come out rectangular).
First- spread a nice layer of your mushroom pesto down over your crust.
Next - top with your sauteed balsamic onions.
Then place your steamed spinach evenly over the onions.
Now top with your crumbled crispy prosciutto.
Then evenly top with your grated fontina cheese.
Finally, add your sauteed mushrooms to the very top of the pizza.
Place in your broiler to melt the cheese and bring all your toppings together - about 5 minutes, depending on how hot your broiler is. Keep an eye on it because you don't want your pizza to burn!! Remove and serve with crushed red pepper and your favorite grated Parmesan or Romano cheese.

Thursday, February 9, 2012

Salmon Livornese

Over the last 9 months, I've eaten a lot of salmon. When you're pregnant, there aren't many fish that you can eat that I actually like. I love swordfish and tuna, but they are off limits. I'm not a big fan of flounder, tilapia, cod or haddock, which you can readily find in the grocery store, so I usually go for salmon. Fortunately, like chicken, salmon is quite a versatile fish that can hold up to a ton of different recipes. Most of the time, I keep it pretty simple - roasted salmon, grilled salmon, or sauteed salmon. Tonight however, I wanted something different. Something tasty. I had enjoyed Salmon Livornese at a local Italian restaurant in the past, so I googled it up and found an absolutely beautiful picture of a prepared Salmon Livornese on Chef Benny Doro's blog.
Photobucket
It's a pretty simple preparation, very healthful and light and perfect for an easy dinner that looks fancier than it is. He doesn't give measurements for the recipe on his blog, so I've modified the recipe to include my measurements. My technique was a little different as well so while I've linked to his exact version above, I've posted my method below. I served this with steamed haricot verts (the thinner green beans) and a nice field greens salad topped with candied walnuts, gorgonzola, sliced pears and red pepper. If you're tired of the same old salmon dish, give this a try! You could also easily substitute tuna or swordfish for salmon, even fresh rockfish would probably hold up well in this dish. Enjoy!

Salmon Livornese
adapted from Chef Benny Doro
Photobucket
Serves 4 people

4 6 oz portions of salmon
1/2 lemon

For the Tomato Sauce:
1 shallot
3 cloves garlic
2 carrots
2 celery sticks
1/4 cup olive oil
1 tb tomato paste
1 28-oz can diced or crushed tomatoes (depending on if you want a chunky or smooth sauce)
15 kalamata olives, chopped
2 tb capers, drained
1/2 tsp red chili pepper flakes (or more if you like more heat)
salt and pepper for seasoning
chopped Italian parsley for garnish
grated parmiggiano reggiano or pecorino romano for serving

Preheat oven to 400 degrees.

Prepare your salmon fillets by spritzing them with fresh lemon juice. Set aside.

Meanwhile, in a food processor mince your shallot, garlic, carrots and celery. Add to a large skillet along with your olive oil and cook until vegetables are soft and fragrant. Once softened, add in your tomato paste. Allow to cook for another 2 minutes and combine. Now add your tomatoes with the juice and allow to cook until slightly thickened. Finally add your olives, capers and red chili flakes and let simmer another 3 minutes to allow the flavors to combine. Nestle your fish portions down in the sauce and cover your skillet with lid or foil. Place in your preheated oven. Cook for 25 minutes, or until flesh is firm. Remove dish and uncover before returning to the oven to cook for an additional 5 minutes. Serve hot and top with parsley and cheese.
Photobucket

Wednesday, January 11, 2012

Old School Ham and Navy Bean Soup

I'm back!! After an extremely long hiatus, I plan to hopefully pick up my spatula and get back to blogging. Life has been busy with a toddler in the family, and when I'm not with my daughter (mainly because she's napping or sleeping) I'm trying to finish other chores and things around the house. But I have truly missed blogging my food adventures so I'm going to try my best to get back to steady updates. However, there may be a slight wrench thrown into this plan come the end of February. We are expecting baby girl #2 on Feb. 25!! We're so blessed and excited, though I'm sure that will slow down blogging again for a little while. I may turn this blog into a family and food blog with baby updates and stories. We shall see.
Anyway, to the task at hand - SOUP! While it is January and officially winter here on the east coast, the temps have been pretty mild as of late. Just these past two weeks we had more than one 55-60 degree day! Quite unusual for January. But I'm not complaining!! Despite the balmy temps, I still crave wintertime comfort foods and there is nothing better than homemade soup.
Photobucket
I had catered a Christmas luncheon for 60 people before the holidays and they ordered two spiral cut brown-sugar glazed hams as part of their menu. I kept the large bones from both hams and froze them to use for future use as soup - the unknown profits of catering.
This recipe is truly a family recipe. My grandmother used to make this soup and my mother after here. I still remember coming home from school in January - it was something we usually had after the holiday ham had been long gone - to warm, hearty bowls of ham and bean soup.
Photobucket
Who knew some meaty ham bones could make such a glorious pot of soup? This soup is cheap to make and chock full of good vegetables and tender beans. It's the perfect thing to warm you up on a cold winter night...that is if you are having those where you live. Enjoy!!

Old School Ham and Navy Bean Soup


Photobucket
2 lbs of dried navy beans
8-10 cups of hot water
2 ham bones with meat on them from spiral cut hams, smoked or brown sugar glazed will work (1 ham bone would be sufficient as long as it has a good amount of meat on it. If you don't have ham bones from an actual ham, then you may be able to ask the butcher for them.)
4 bay leaves
1 12oz bag of frozen cut carrots
1 onion, diced
6 stalks of celery, sliced
2 tb tomato paste
1 14.5 oz can of diced tomatoes with the juice
1 Parmesan rind, whole, for flavor (this is the hard part of the back of the block of cheese that doesn't grate well. If you don't have it, then just leave it out. You can always top the finished soup with grated Parmesan or Pecorino Romano.)
1 -2 tsp cayenne pepper, depending on how much heat you want
freshly ground black pepper to taste

To begin, you will need to cook and soak your beans. Rinse the beans and then put them in a large, heavy bottom stock pot and cover with the water. Bring the beans to a boil, boil for 3 minutes and then turn the heat off, cover and allow the beans to soak for one hour.
Once the beans have soaked, add in your ham bones with the meat and the bay leaves to the pot and bring it to a boil. Reduce to a simmer and allow to simmer for 2 1/2 hours. At the end of the time, check your beans to make sure they are tender. If so, remove the ham bones and using a pair of disposable gloves (because the bones will be hot), remove the meat from the bones and shred it into the soup. Once your bones have been picked of meat, you can add the large ones back to the pot along with your vegetables, tomato paste, tomatoes and Parmesan rind. Allow the soup to simmer until the vegetables are tender, about another 1/2 hour should do it. Add in your cayenne and black pepper. Taste for seasoning (you shouldn't have to add any salt because the ham meat and bones should add enough but taste to make sure).
Serve soup hot. Top with grated Romano cheese if desired.
(Leftovers of this soup may solidify a bit because of the starch from the beans and the fat from the ham. When reheating just add a little bit of water to help liquefy the soup.)